Compressor Basics
Published:
One of the most important things to learn when using a compressor is knowing when to use it. This statement might sound a bit tricky, but if you’re writing a song, not every element in the song always needs compression. We can use a compressor to make things “thicker,” to make them “thinner,” to add “color,” to trim some unwanted peaks, and some people use compressors to make the music sound “more impactful.” Compressors have many uses, and in this article, I’ll try to show you some of the basic knowledge to help you find new ways to use compressors.
Let’s start with a question: What is the purpose of a compressor?
A compressor can be used for many purposes, the most common being to lower the louder parts of audio without affecting the parts that are already quiet. For example, when our audio’s peak volume is too high but the average volume RMS is not very large, we can use compression to reduce the peaks, then raise the overall volume to increase the average loudness.
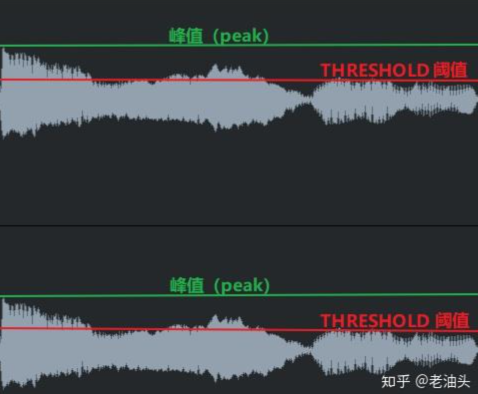
Here’s an example where the first half of an audio clip is much louder than the second half, so much so that I can’t turn it up because the first half would become too loud to edit. However, after compressing the audio, we see that only the audio volumes above the threshold are reduced, and the audio now becomes more balanced. Now, I can boldly enhance the overall signal without worrying about clipping over 0dB.
Threshold:
See the line labeled “THRESHOLD” in the image above? Here’s how to understand “threshold,” “compression ratio,” and “gain”:
Imagine we give the compressor an instruction: “Put a marker at -15dB. If any audio exceeds this marker, reduce the volume there, but not immediately reduce the volume; over the time I set, the audio will go from uncompressed to fully compressed (say I set the time to 200ms. So, once some audio exceeds -15dB, it will take 200 milliseconds to fully start compressing that audio). Continue to compress the audio until the original volume falls below -15dB again. Once this happens, release the audio and return it to normal volume, but do not immediately release it; it takes 200 milliseconds to gradually return to uncompressed.”
More specifically, we tell the compressor that the -15dB we set is called “threshold.” Any audio passing through it will have its volume reduced according to the set compression ratio, and any audio below it will not trigger the compressor and will pass through as is. But when audio exceeds the threshold, it triggers the compressor to start working; if no audio passes the threshold, compression will never be triggered.
Once the audio has consistently exceeded the threshold, start compressing. How much should it compress? At this point, it depends on our set compression ratio (Ratio). Compression ratios have two numbers, the first number can be seen as the input decibels, the second number as the output decibels. The second number (also the output decibel) will always be 1, for example, when the compression ratio is 4:1, for every 4dB of audio that exceeds the threshold, the output will only have 1dB. Therefore, if you raise the threshold by 4dB and set the compression ratio to 4:1, the output signal will be only 1dB higher than the threshold, not 4dB. Conversely, if the signal increases at the same 4:1 compression ratio, input 8dB above the threshold, the output will be 2dB above the threshold, and so on (8dB divided by the compression ratio 4).
After reducing the loud parts in the audio through compression, we can use Make-Up Gain, which just adds volume to the entire signal to “make up” for all the now reduced peaks. We can choose to only add volume at the end of compression to restore levels, in case of losing a lot of volume due to compression.
Talking about “Attack and Release”
Attack is the amount of time it takes for the compression to go from trigger to full compression, simply put, it’s the startup time. Measured in milliseconds (ms), once the signal has exceeded the threshold, from no compression to full compression, the compressor will use our set startup time to increase compression, until it reaches full compression status by the end of the startup time. During the startup phase, compression will continue until the audio drops below the threshold. Once the “startup” phase ends and the signal has fallen below the “threshold,” then the Release phase can start.
The release function is quite special. The “Attack” function only compresses audio above the threshold, but the “Release” function is different, actually compressing audio below the threshold. When the audio is below the threshold, the compressor will automatically detect where the audio is and start compressing the audio there. The “Release” function we adjust on the compressor is the time (in milliseconds or seconds) we want the compressor to gradually restore from a bit of compression to the original uncompressed audio level. If any audio peaks exceed the threshold during the release time, these peaks will be compressed until the release time ends.
Sometimes, when audio drops below the “threshold,” some compression can make the compression sound smoother, some might say more “natural.” Similarly, this way of compressing can help cover up any hissing or noise that occurs when the signal suddenly drops below the threshold.
A few examples:
Once the audio signal drops below the threshold, you can use the release time to control (compress) certain peaks after the startup time. The duration depends on your release time.
When some audio is highly compressed and sounds a bit flat, a bit of compression during the Release phase can actually make the audio generate some dynamics.
When some audio has a long release time, you can generate some momentum for some audio by gradually switching from the compressed state to the uncompressed state during the “Release” phase.
If you don’t want that kind of compression in the “Release” phase, just use the fastest release time on the compressor. I found that by using a fast attack and fast release (usually both under 50ms), the compressor produces distortion, because the compressor tries to follow the actual waveform of the signal, not the general shape of the audio.
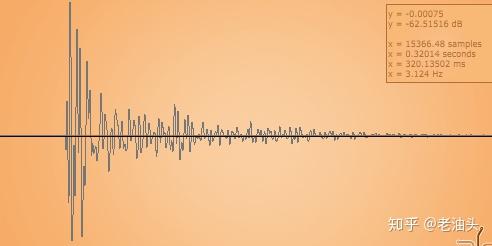
Below is an uncompressed original audio:
Now look at the compressed:
“Figure-1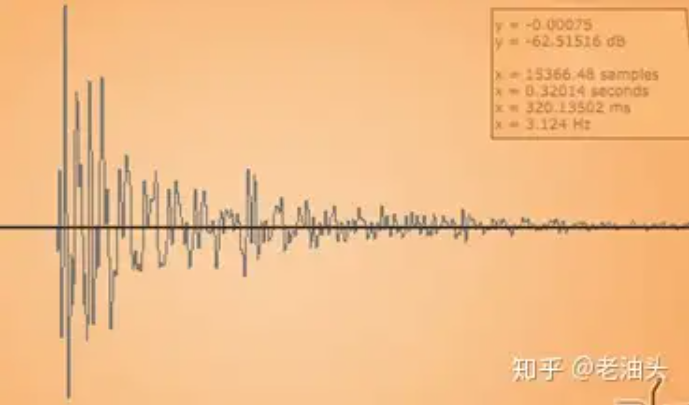 ”
”
“Figure-2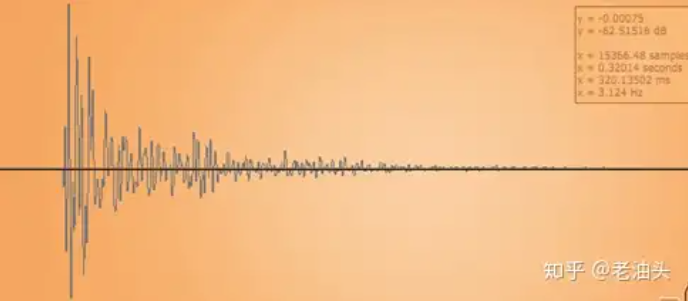 ”
”
“Figure-3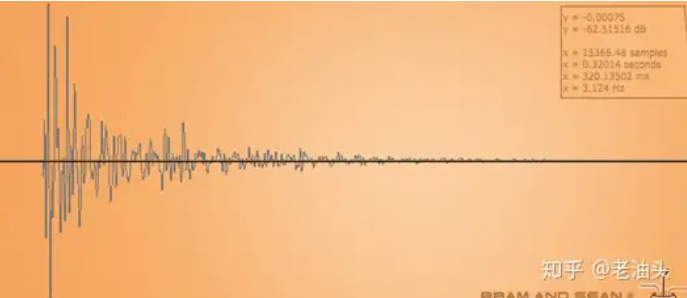 ”
”
In the three images above, you can visually see the types of curves applied by “Attack” and “Release.”
In Figure 1, you can see that the audio length is about 300ms, because I set the startup time to 100ms, so the first audio compared to others will be steeper.
In Figure 2, I used a 200ms startup time, you can see how Attack compresses the entire 200ms audio segment from the original volume to fully compressed at the end of the curve.
In Figure 3, I set the startup time to 400ms, but the length of the audio part is only 300ms, the compressor will have enough time within the shorter 300m part to reach full compression, and only one-third before the gain is reduced, until the compressor detects the drop below the threshold and enters the release phase.
In the Release phase, you can clearly see in the three images that after the signal drops below the threshold, it will still compress a bit, depending on the time you specified (in milliseconds or seconds), how long it takes to recover from that bit of compression to the original uncompressed audio level.
By reducing the peaks at the beginning of the audio segment, I will be able to flatten the audio segment, in which case, I will use a very fast Attack to start compressing the audio at the first signal that exceeds the Threshold. But sometimes when you compress, you might want to let some original audio pass before the audio segment is fully compressed. In this case, we can set a not too fast Attack (startup) time, depending on the audio, to ensure that some original uncompressed audio passes before full compression.
Suppose I compress a drum like the “Action Snare,” which is a bit different from many other snares, “Action Snare” makes a lot of noise after the drum hit. This special drum’s drumming sound is very loud, but it’s covered by noise afterwards. In this case, you can set a medium attack, not too fast, but not too slow, because you actually want to compress the main noise to enhance the hitting feel.
Below is my final decision on compression settings:
Threshold: -30dB (a lower threshold to ensure the audio has enough time to fully compress during the Attack phase and can be reduced below the Threshold to ensure it doesn’t enter the Release phase too quickly)
Compression ratio: 4:1 (as above, the compression ratio depends on how much signal in the audio exceeds the threshold. Here, the drumming sound must be completed before it drops below the threshold and enters the release phase)
Startup time: 220ms (after sliding the Attack knob back and forth, I determined this value, at that point it starts to become more lively)
Release time: 100 milliseconds (in this case, the release time is not very important, but I set it to 100 milliseconds to be safe, to avoid the release time still being effective before the next snare is struck. I don’t want the release time until the next snare is hit, it’s still compressing) In this case, most snares usually have much shorter startup times (30-50ms), needing a very long startup time to make the compression sound natural. You can use a higher threshold and a shorter startup time. Conversely, under a longer startup time and lower threshold, I took advantage of the “startup time” shape:
The curves I’ve shown before can make compression sound smoother, or more “natural.” But please note, these curves vary with different compressors, so 200ms on one compressor might sound exactly like 100ms on another.
Some compressors might not be able to catch the first few peaks, or you might decide to delay the Attack a bit to let some original audio pass, in which case, you need to use a limiter following the compressor. Limiters can be understood as compressors that set the Threshold to 0dB, an ∞:1 compression ratio, and have an extremely fast startup time, they usually have an “auto-release” feature. A limiter can guarantee absolutely no peaks over 0dB (unless you have other settings), to avoid clipping distortion.
Coloration of the Compressor
Above I explained how to lower excessively high peaks, raise the volume, thereby raising the average volume to previous levels. This might be one reason some people think compression makes the audio “fatter,” because it not only increases the peak volume. It also makes the audio flatter, then the average volume (RMS) can be raised. But, about compressors, average volume is not the end. Each compressor has its unique coloration. It’s well known that some compressors will make the audio “darker” or “softer,” this can be more obviously heard in audios like drum hits, we will notice the drum hit sound becomes more “dim,” or it will make the audio distort.
Some compressors will have their specific other additional features, you can find more information about these features in their manuals or ask others.
This is my first time writing a tutorial, I really hope this tutorial can be useful to everyone. Therefore, if you find any errors to be resolved, disagree with some content, or have any content you want to add, please PM me, I will correct or update this tutorial.
One last thing, I learned about s(M)exoscope oscilloscope in Professor Xu’s class, it’s a free plugin, I think it’s very suitable for learning to use, and can observe what’s happening with the audio signal when learning how to use a compressor. It visualizes what’s happening. But never forget: observe what’s happening, but trust your ears, make decisions with your ears, not your eyes.
